How to Design Professional QR Codes for Restaurant Tables (Free Templates)
Step-by-step guide: Turn basic QR codes into branded table tents, stickers, and posters. Canva templates included. Takes 15 minutes.
TLDR: Your QR Code Doesn't Need to Look Boring
You've generated your QR code. It's black and white. Functional. Boring.
The problem: A plain QR code on a table looks like an afterthought. Customers aren't sure what it does. Some ignore it completely.
The solution: 15 minutes in Canva (free). Your QR code becomes a branded table tent that says "Scan for menu" in your restaurant's style. Download transparent PNG. Print on Avery stickers. Done.
What you need:
- Your EasyMenus QR code (already generated)
- Canva free account
- 15 minutes
- £8 for Avery stickers (100 labels) OR £12 for table tent card stock
Result: Professional-looking QR deployment that matches your restaurant's aesthetic. Customers know exactly what to do.
[Download free Canva templates - table tents, stickers, posters included]
Why Your QR Code Presentation Actually Matters
It's Tuesday afternoon at a London pub. Two tourists sit down. They see a small black-and-white QR code stuck to the table corner. No context. No branding.
"Is this for the menu?" one asks.
"Maybe? Could be Wi-Fi. Or payment. Not sure."
They wait for a server instead.
This happens constantly. Not because QR codes don't work. Because presentation gives zero context.
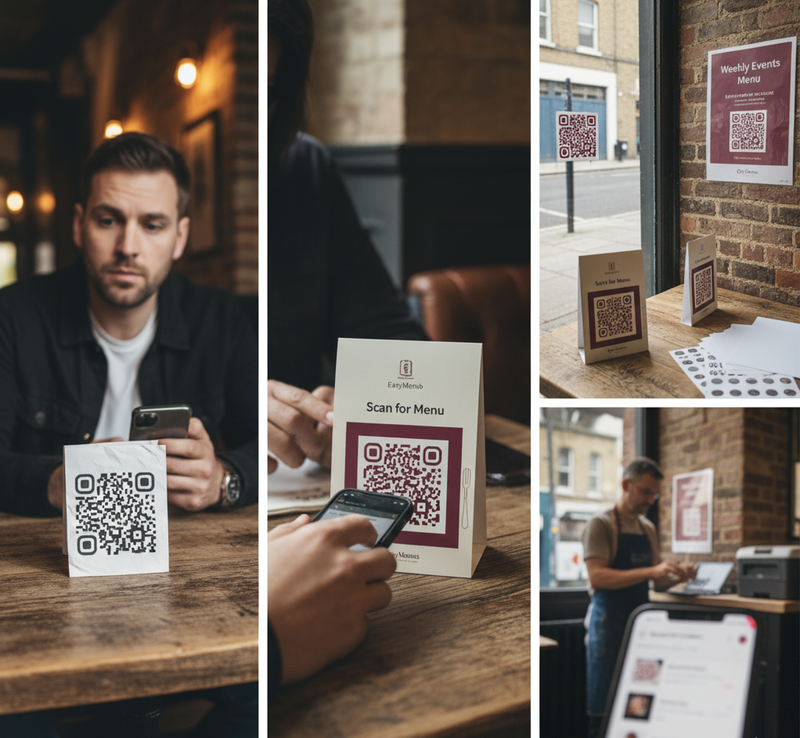
What Works: Clear Context + On-Brand Design
Same pub, different table. Table tent card (10cm × 7cm) shows:
- Pub logo at top
- Clear text: "Scan for full menu"
- Branded QR code (pub's colors)
- Small text: "Food, drinks, allergens"
Tourists sit. Immediately scan. Order within 2 minutes. No server needed for initial order.
The difference: Context. Branding. Clarity.
The Three QR Code Formats That Actually Get Used
1. Table Tents (Highest Scan Rate)
Best for: Sit-down restaurants, pubs, cafés
Why they work:
- Eye-level when seated (impossible to miss)
- Two-sided (visible from both sides of table)
- Stable (doesn't blow away or slide off)
- Space for context ("Scan for menu + allergens")
Size: 10cm × 7cm folded (standard table tent)
Material:
- Economy: 250gsm card stock (£12 for 50 sheets at Ryman)
- Premium: 350gsm + lamination (£24 for 50 sheets)
Lifespan:
- Unlaminated: 3-6 months (indoor use)
- Laminated: 12-18 months
Print cost: £0.24-£0.48 per tent (DIY at home) OR £1.20-£2.40 (print shop)
Template: [Download table tent Canva template]
2. Transparent Stickers (Most Versatile)
Best for: Windows, mirrors, glass doors, laminated menus
Why they work:
- No background (blends with any surface)
- Permanent or removable options
- Weatherproof if using outdoor vinyl
- Cheap (£8 for 100 stickers)
Size: 5cm × 5cm (QR code itself) OR 7.5cm × 7.5cm (with text context)
Material:
- Avery L7121-25 clear labels (25 sheets, 8 labels/sheet = 200 labels, £8.50)
- For outdoor use: Vinyl waterproof stickers (£15 for 100 from Vistaprint)
Where to place:
- Window near entrance: "Scan to view menu before entering"
- Bar mirror behind bottles: Visible while waiting for drinks
- Table edge: Discreet but accessible
- Takeaway counter: "Scan to order for collection"
Template: [Download transparent sticker Canva template]
3. Wall Posters (Events & Specials)
Best for: Event menus, seasonal specials, private dining rooms
Why they work:
- Large format (A4/A3) = impossible to miss
- Include photos of dishes
- Change easily for themed nights
- No table clutter
Size:
- A4 (21cm × 29.7cm) for small walls/doorways
- A3 (29.7cm × 42cm) for main walls
Material:
- Basic: 120gsm poster paper (£0.15/sheet at home)
- Premium: 200gsm gloss photo paper (£0.50/sheet)
- Outdoor: Vinyl banner (£25 for A3 from Vistaprint, weatherproof)
Use cases:
- Belgian beer pub: "100+ Belgian beers - Scan QR for full list with tasting notes"
- Sunday roast special: Large photo of roast + QR for full Sunday menu
- Event menu: "Burns Night Supper Menu - 25 January" with themed graphics
Template: [Download A4 poster Canva template]
Step-by-Step: Design Your QR Code in Canva (15 Minutes)
Step 1: Get Your QR Code (2 Minutes)
- Log into EasyMenus dashboard
- Go to QR Codes section
- Select your published menu
- Customize color/style if desired (optional)
- Click Download QR Code → Save as PNG
Pro tip: Download high-resolution (at least 1000×1000 pixels) for print quality. Low-res QR codes look pixelated when printed large.
Step 2: Open Canva Template (1 Minute)
Option A: Use our pre-made templates
Option B: Start from scratch
- Go to Canva.com (free account)
- Click "Create a design"
- Custom size:
- Table tent: 20cm × 7cm (fold in half = 10cm × 7cm)
- Sticker: 7.5cm × 7.5cm
- Poster: A4 (21cm × 29.7cm)
Step 3: Upload Your QR Code (1 Minute)
- Click "Uploads" in left sidebar
- Click "Upload files"
- Select your QR code PNG
- Drag onto canvas
Step 4: Add Your Branding (8 Minutes)
Essential elements:
- Restaurant name/logo (top)
- Upload your logo OR use text with your font
- Keep it small (10-15% of total design)
- Clear call-to-action (above QR)
- "Scan for full menu"
- "View menu + allergens"
- "Order & pay here"
- Font: Bold, 18-24pt, high contrast
- QR code (center)
- Size: 40-50% of total design
- Ensure at least 2cm × 2cm when printed
- Leave white space around it (quiet zone)
- Context text (below QR, optional)
- "Food • Drinks • Allergens"
- "Updated daily"
- Small font (10-12pt)
Design principles:
- High contrast (dark QR on light background OR light QR on dark background)
- Simple (max 3 colors)
- Readable from 30cm distance (typical table viewing distance)
Avoid:
- Decorating the QR code itself (can break scanning)
- Busy backgrounds that reduce QR contrast
- Text smaller than 10pt (illegible from distance)
Step 5: Download & Test (3 Minutes)
- Click "Share" → "Download"
- Format:
- For printing: PDF (highest quality) OR PNG (300 DPI)
- For transparent stickers: PNG with transparent background
- Download
- CRITICAL: Test before mass printing
- Print one test copy
- Scan with your phone from 30cm away
- If it doesn't scan instantly, QR is too small or low contrast
Print & Deploy: The Cheap DIY Method
Table Tents (Home Printer)
What you need:
- Downloaded PDF/PNG
- Home inkjet/laser printer
- 250gsm card stock A4 (£12 for 50 sheets, Ryman)
- Scissors or paper cutter
- Optional: Laminator (£25 from Argos) + laminating pouches (£8 for 100)
Process:
- Print on card stock (check "thick paper" setting on printer)
- Cut along fold line
- Score center line with ruler + craft knife (light pressure)
- Fold in half
- Optional: Laminate before folding for durability
Cost: £0.24 per table tent (50 tents from 1 pack of card stock)
Time: 15 minutes for 20 tents
Transparent Stickers (Home Printer)
What you need:
- Downloaded PNG with transparent background
- Inkjet printer (laser doesn't work on this material)
- Avery L7121-25 clear labels (£8.50 for 200 labels)
Process:
- Open Avery Design & Print (free software) OR use Canva's Avery template
- Import your PNG
- Print (select "Avery L7121" in printer settings)
- Wait 2 minutes for ink to dry
- Peel and stick
Cost: £0.04 per sticker
Time: 5 minutes for 24 stickers (3 sheets)
Posters (Print Shop Alternative)
If you can't/won't print at home:
Ryman: A4 color print on 200gsm = £1.20 per poster
Vistaprint: A3 gloss poster = £3.80 per poster (but cheaper in bulk)
Instantprint: 100 × A4 posters = £28 (£0.28 each)
When to use print shop instead of home:
- Need waterproof material (vinyl)
- Want professional lamination
- Printing 50+ units (bulk discount applies)
- Don't own a decent printer
Real Restaurant Examples
Borough Market Wine Bar (Table Tents)
Challenge: Natural wine list changes daily. 80+ wines. Printed lists cost £45 weekly.
Solution:
- Designed branded table tents (dark green + cream, matching wine bar aesthetic)
- QR code links to live wine list (updated daily)
- Text: "Natural wines • Scan for today's list"
- Printed 25 tents on 350gsm card, laminated
- Cost: £18 (one-time)
Result:
- Zero weekly printing costs
- Customers scan before server arrives
- Wine questions dropped 60% (descriptions on digital list)
- Tents still in perfect condition after 8 months
Shoreditch Café (Window Stickers)
Challenge: Passersby can't see menu from outside. Many don't come in.
Solution:
- Transparent sticker on front window (15cm × 15cm)
- Café logo + "Scan for full menu"
- QR code (high contrast - black on clear, shows white wall behind)
- Positioned at eye level next to door
Result:
- Customers scan before entering
- Lunchtime walk-ins up 23% (people who checked menu first)
- Delivery customers scan from street instead of entering for takeaway menu
Brixton Event Space (Posters)
Challenge: Hosts different events weekly (jazz night, quiz night, private dining). Each needs different menu.
Solution:
- A3 poster template with QR code
- Update poster weekly with event theme
- Same QR code, but menu behind it changes per event
- Print at home on glossy photo paper (£0.50 per poster)
Result:
- Event menus ready in 10 minutes (design in Canva, print, done)
- No more "sorry, we ran out of printed event menus" situations
- £2,400 annual savings vs. professional printing for 50 events yearly
Common Mistakes (And How to Avoid Them)
Mistake 1: QR Code Too Small
Wrong: 1.5cm × 1.5cm QR code on table tent
Why it fails: Customers with older phones can't scan. Reading distance too close (5cm) = awkward.
Right: Minimum 2cm × 2cm, ideally 4cm × 4cm for table tents
Test: Can you scan it from 30cm away? If not, it's too small.
Mistake 2: Low Contrast
Wrong: Grey QR code on light grey background
Why it fails: Camera can't distinguish QR pattern from background.
Right: Black QR on white/cream OR white QR on dark background. High contrast always.
Test: Take photo of your design in low light (like restaurant evening ambiance). Can your phone's camera still detect the QR? If not, increase contrast.
Mistake 3: Decorating the QR Code Itself
Wrong: Adding restaurant logo in center of QR, changing QR squares to circles, putting texture over QR
Why it fails: QR codes have error correction, but too much modification breaks them.
Right: QR code stays intact. Add logo/branding AROUND the QR, not inside it.
Test: After any customization, scan the QR before printing 100 copies.
Mistake 4: No Context Text
Wrong: Just a QR code, no text
Why it fails: Customers don't know what it's for. Menu? Wi-Fi? Payment? They ignore it.
Right: "Scan for menu" or "View full menu + allergens" above QR code
Mistake 5: Wrong Material for Location
Wrong: Paper sticker on outdoor window (rain destroys it in 2 days)
Why it fails: Materials matter. Paper isn't weatherproof.
Right:
- Indoor tables: Card stock, laminated = fine
- Outdoor tables: Vinyl stickers, weatherproof card stock
- Windows/outdoor: Vinyl only
Free Templates + Assets
We've created ready-to-use Canva templates in common restaurant styles. Duplicate, add your QR code, download, print.
Table Tent Templates
- Classic Black & White →
- Gastropub (Dark Wood + Gold) →
- Modern Minimal (Clean White) →
- Cafe Style (Pastel + Handwritten Font) →
Sticker Templates
Poster Templates
Customization Guide
Once you open a template:
- Click logo placeholder → Delete → Upload your logo
- Click "Restaurant Name" text → Change to your name
- Click QR code placeholder → Delete → Upload your QR
- Optional: Change colors to match your brand
- Download → Print
All templates:
- Pre-sized for common print formats
- High-contrast QR placement
- Text optimized for 30cm reading distance
- Print-ready (300 DPI)
Quick Reference: Which Format When?
Use Case Best Format Why Cost Standard table service Table tent Eye-level, two-sided, stable £0.24 each Window/door Transparent sticker Shows menu before entry £0.04 each Bar/counter Sticker or small tent Limited space, frequent use £0.04-£0.24 Outdoor seating Vinyl sticker or laminated tent Weatherproof needed £0.15-£0.50 Event menu A4/A3 poster Large, eye-catching, changes often £0.50-£1.20 Takeaway counter A4 poster at eye level Queue viewing while waiting £0.50 Private dining room A3 poster or table tent Special event feeling £1.20-£3.80
The Honest Reality
Fancy QR code designs don't make your food better. A £8 pack of Avery stickers isn't a competitive advantage.
What they do: Remove friction. Customers immediately know "this QR is the menu." They scan. They order. Less confusion. Faster service.
The ROI isn't in the design. It's in the 10 seconds saved per customer by giving clear context. Over 200 covers weekly, that's 33 minutes of collective customer confusion eliminated.
Design serves clarity. Clarity serves speed. Speed serves volume.
Your QR code's job isn't to look pretty. It's to get scanned. Everything else is secondary.
Next Steps
- Generate your QR code in EasyMenus dashboard (if you haven't)
- Pick your format (table tent, sticker, or poster based on venue)
- Download matching template (or design your own in 15 minutes)
- Print one test copy and scan it from 30cm away
- If it scans instantly: Print 20-50 copies
- If it doesn't scan: Increase QR size or contrast, test again
- Deploy: Place on tables, wait for customers to scan
Most restaurants have QR codes on tables within 24 hours of generating them. The design part takes 15 minutes. The printing takes 10 minutes. The hard part was already done—you've already digitized your menu.
Now make sure customers actually use it.
[Generate your QR code now → Go to EasyMenus dashboard]
Common Questions
Can I use my restaurant's brand colors for the QR code itself, or does it have to be black and white?
You can customize QR code colors in the EasyMenus generator (see color presets), but follow high-contrast rules: Dark color on light background OR light color on dark background. Avoid: Red on orange, blue on purple, grey on grey. Test by scanning in low light—if your phone struggles, contrast is insufficient. Classic black on white has highest reliability (99.9% scan success), but burgundy on cream (high contrast) works fine too. The QR code's PATTERN matters, not the specific colors—just ensure stark contrast.
Do I need a professional designer, or can I genuinely do this myself in Canva?
Genuinely DIY-able. Canva's free tier has everything you need. Our templates eliminate design decisions—you're just swapping your logo and QR code into pre-made layouts. If you can upload a file and click download, you can do this. Borough Market wine bar owner (quoted earlier) did theirs in 18 minutes, no design experience. Where people struggle: Print settings (select "thick paper" for card stock) and testing (scan before mass printing). Design itself is paint-by-numbers with templates.
What's the cheapest possible deployment if I'm printing 50 table tents for a small restaurant?
DIY home printing: £12 for 250gsm card stock (50 sheets at Ryman) + your existing printer ink = £0.24 per tent × 50 = £12 total. Add £8 for laminating pouches if you own a laminator (extends lifespan from 3 months to 18 months). No laminator? Unlaminated card stock lasts 3-6 months indoors—acceptable if reprinting costs £12 twice yearly. Cheapest viable method: £12 upfront, £12 annually for replacements. Compare to printed menus at £220 every menu change.
How do I make the background transparent for stickers in Canva?
Canva Pro feature only (£10.99/month). Free workaround: Design your sticker with WHITE background (not transparent), then print on transparent Avery labels—the white prints as opaque, everything else is clear. Alternative: Use free tool "Remove.bg" to remove background from your downloaded PNG, then re-upload to Canva. Or: Pay for Canva Pro for one month (£10.99), design all your templates, download everything, cancel subscription. Most cost-effective for one-time design if you're creating multiple formats (tents, stickers, posters).
My printer doesn't have "thick paper" setting—can I still print table tents on card stock?
Yes, but adjust manually: Printer settings → Paper type → Select "Cardstock" or "Heavy paper" or "Photo paper" (depends on printer model). This slows down print speed and increases ink saturation. If you can't find these settings, print on normal 120gsm paper instead—it's flimsier but works. Reinforce by folding twice OR glue two printed sheets back-to-back for stability. Or use print shop: Ryman prints on 250gsm for £1.20 per A4 sheet (makes 2 table tents) = £0.60 per tent, still cheaper than reprinting full menus.
Table tents keep falling over on our tables—how do we make them stable?
Three solutions: (1) Heavier card stock: Upgrade from 250gsm to 350gsm (more rigid, won't tip easily). (2) Weight the base: Fold bottom flap outward, attach small adhesive weights (£3 for pack of 50 at craft stores) or a coin using double-sided tape. (3) Adhesive base: Add removable sticky pads (Blu Tack or poster putty) to bottom corners—sticks to table lightly, easy to move for cleaning. Or ditch table tents and use stickers instead—adhered directly to table edge, impossible to knock over. Borough Market wine bar switched from tents to edge stickers after this exact problem.